Elven Queen
Believe it or not I actually have quite a bit of new art to post, so I am going to try and spread it all out over the next couple of days. Tonight's Illustration is one that I created for the portfolio that I was showing around Comic Con. Since I got a decent response from the last "step by step" piece that I posted, I decided to do it again. I'll see what I actually remember from each stage.
Step 1

Initial sketch. It's pretty quick and loose, but I like it enough that I decide to flesh it out.

I mirrored the image to correct any obvious problems with the character (mostly in the face) and realize that I like it better that way, so it stays. I start throwing in basic color ideas and work in some background details. Somewhere along the lines I decide that the puffy shoulders of her dress are starting to look like heads of lettuce so they become sharper and flow backwards instead.
I've added more detail to the dress and evidently decided the shoulders are now going to be more like armor. I am avoiding her hand because I have no idea what I want to do with it, aside from it being all "magical". Trying to keep the colors in the greens, silvers and blues as much as possible. I added a seam down the middle of her dress to add some more interest and give it dimensionality.
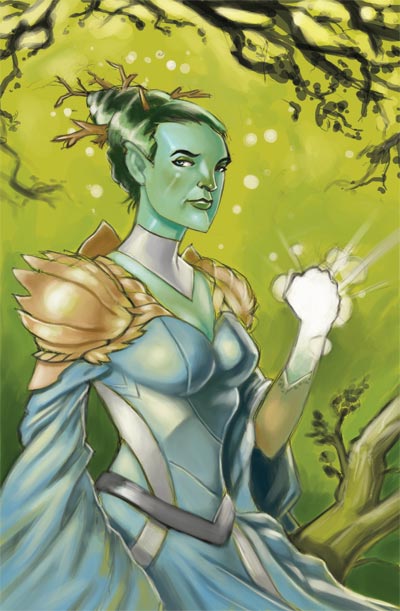
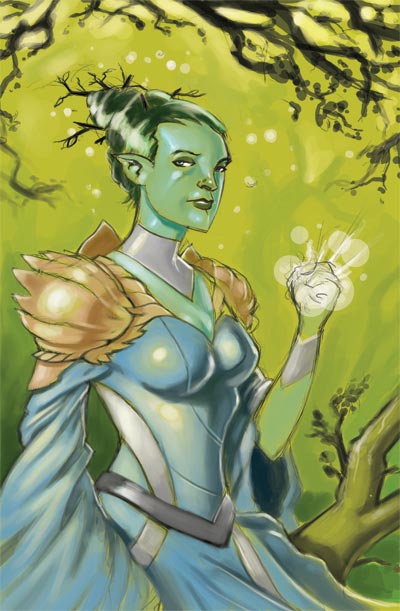
More general cleanup. Somewhere in working on her face I made her older, and a little more stern. This is probably where she went from "Elf Princess" to "Elf Queen". I decided her hand is going to be fully engulfed in light, glowing with some sort of "power". I got rid of the weird bracelet/cuff thing she was wearing, replacing it with a shirt sleeve that worked better with the new hand design.
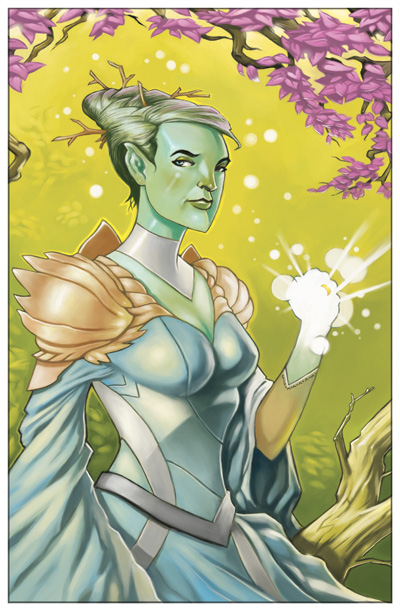
It would seem that this is where I forgot to save more steps, so it's now finished. I decided to have pink leaves in the branches above her head to soften the image a bit and add in some more color. I finally address the rat's nest hair. I gave her a gold ring, perhaps to explain the "magic hand" and cleaned up the radiant light from the aforementioned "magic hand". Subtle background elements are introduced and the overall color gradient from top to bottom is smoothed out. The color is adjusted. Everything is made "pretty".
Well that's it for tonight, I hope it was educational, or atleast not boring. More tomorrow or the next night, depending on how late into the evening I work.
Step 1
Initial sketch. It's pretty quick and loose, but I like it enough that I decide to flesh it out.
Step 2
I mirrored the image to correct any obvious problems with the character (mostly in the face) and realize that I like it better that way, so it stays. I start throwing in basic color ideas and work in some background details. Somewhere along the lines I decide that the puffy shoulders of her dress are starting to look like heads of lettuce so they become sharper and flow backwards instead.
Step 3
I've added more detail to the dress and evidently decided the shoulders are now going to be more like armor. I am avoiding her hand because I have no idea what I want to do with it, aside from it being all "magical". Trying to keep the colors in the greens, silvers and blues as much as possible. I added a seam down the middle of her dress to add some more interest and give it dimensionality.
Step 4
More general cleanup. Somewhere in working on her face I made her older, and a little more stern. This is probably where she went from "Elf Princess" to "Elf Queen". I decided her hand is going to be fully engulfed in light, glowing with some sort of "power". I got rid of the weird bracelet/cuff thing she was wearing, replacing it with a shirt sleeve that worked better with the new hand design.
Step 5
It would seem that this is where I forgot to save more steps, so it's now finished. I decided to have pink leaves in the branches above her head to soften the image a bit and add in some more color. I finally address the rat's nest hair. I gave her a gold ring, perhaps to explain the "magic hand" and cleaned up the radiant light from the aforementioned "magic hand". Subtle background elements are introduced and the overall color gradient from top to bottom is smoothed out. The color is adjusted. Everything is made "pretty".
Well that's it for tonight, I hope it was educational, or atleast not boring. More tomorrow or the next night, depending on how late into the evening I work.
posted by Patrick at
12:26 AM
![]()
![]()

1 Comments:
Awesome. As always, I am thoroughly impressed.
- Catherine
By Anonymous, at 4:15 PM
Post a Comment
Links to this post:
Create a Link
<< Home